Wednesday 7 December 2016

Open a putty session using batch file.

In my experience i used to have a lot of Ubuntu machines and daily i used to check some details on all the machines.

If u do this manually then u need to open a putty sessions individually and give login and password and then u need to give the commands u required.

In my case i have 10 Ubuntu machines, i need to open them through putty and do a cd to certain path and run some commands on each machine.

So i automated the complete thing.
Now just what i do is just do a double click on the "Batch file" and it will do my all tasks.

What i did in Batch file is:

putty.exe username@example.com -pw password -t -m commands.txt

What the -m does is, that it makes PuTTY instruct the SSH server to start that command(s) INSTEAD of a shell. So once your command finishes, so does the session.

If you want to run the shell after the cd command, you need to add it explicitly to your cmd.txt, like:

cd /my/path ; /bin/bash

Also the -m implies "nopty"/non-interactive mode. To use an interactive shell you need to override that using the -t switch.

putty.exe -ssh example.com -m "c:\path\cmd.txt" -t

Now i just need to add 10 such commands in a batch file with respective usernames, passwords and commands. Then just save that file on desktop and double click on it for execution.

This make my job easy.
Thursday 13 October 2016

Automation for login and logout of GMAIL using Python.

Basic setup required:

First we need to do basic setup of python and the "selenium" module installation.

For basic python setup see the following video's:
Installation of selenium module using pip:

For installing a python module see the following video : https://www.youtube.com/watch?v=5zEQaYBukz4

pip install selenium


Following code is used to login and logout from a GMAIL account:

# Modules to be imported.
from selenium import webdriver
from selenium.webdriver.common.keys import Keys
import time

# Your login details.
email = "<email>@gmail.com"
passwd = "<your password>"

# Browser : Firefox.
driver = webdriver.Firefox()
driver.get("http://www.gmail.com")
time.sleep(2)

# GMAIL login.
username=driver.find_element_by_css_selector("#Email")
username.send_keys(email)
time.sleep(2)
next=driver.find_element_by_css_selector("#next")
next.click()
time.sleep(2)
password=driver.find_element_by_css_selector("#Passwd")
password.send_keys(passwd)
time.sleep(2)
login=driver.find_element_by_css_selector("#signIn")
login.click()

# GMAIL logout.
logout1=driver.find_element_by_css_selector(".gb_8a")
logout1.click()
time.sleep(2)
logout2=driver.find_element_by_css_selector("#gb_71")
logout2.click()

# Closing Browser.
driver.quit()

Note:

Keep seeing my blog for different automation thing that we do manually in our daily life.

Automation for login and logout of Facebook using Python.

Basic setup required:

First we need to do basic setup of python and the "selenium" module installation.

For basic python setup see the following video's:
Installation of selenium module using pip:

For installing a python module see the following video : https://www.youtube.com/watch?v=5zEQaYBukz4

pip install selenium


Following code is used to login and logout from a Facebook account:

# Modules to be imported.
from selenium import webdriver
from selenium.webdriver.common.keys import Keys
import time

# Your login details.
email = "<email>@gmail.com"
passwd = "<your password>"

# Browser : Firefox.
driver = webdriver.Firefox()
driver.get("https://www.facebook.com")
time.sleep(2)

# Facebook login.
username=driver.find_element_by_id("email")
username.send_keys(email)
time.sleep(2)
password=driver.find_element_by_id("pass")
password.send_keys(passwd)
time.sleep(2)
login=driver.find_element_by_id("loginbutton")
login.click()

# Facebook logout.
logout1=driver.find_element_by_css_selector("#userNavigationLabel")
logout1.click()
time.sleep(2)
logout2=driver.find_element_by_css_selector("li._54ni:nth-child(12) > a:nth-child(1) > span:nth-child(1) > span:nth-child(1)")
logout2.click()

# Closing Browser.
driver.quit()

Note:

Keep seeing my blog for different automation thing that we do manually in our daily life.
My next post will be on "GMAIL login and logout automation".

Wednesday 12 October 2016

Modify a PDF file using Python code.

If we generated a pdf file with mistakes and we want to rectify them we can use this code.

Example-1:

Lets consider a pdf file : document1.pdf
and it has 6 pages in it.
Let the mistake we done be the order of paging i.e, 2nd and 4th page should be interchanged.
In this case we can use the python code to make modifications to our pdf file and we can generate a correct pdf file.

Solution:

from PyPdf import PdfFileWriter, PdfFileReader

output = PdfFileWriter()
input1 = PdfFileReader(open("document1.pdf", "rb"))

# print how many pages input1 has:
print "document1.pdf has %d pages." % input1.getNumPages()

# add page 1 from input1 to output document, unchanged
output.addPage(input1.getPage(0))

# add page 4 from input1 to output document, unchanged
output.addPage(input1.getPage(3))

# add page 3 from input1 to output document, unchanged
output.addPage(input1.getPage(2))

# add page 2 from input1 to output document, unchanged
output.addPage(input1.getPage(1))

# add page 5 from input1 to output document, unchanged
output.addPage(input1.getPage(4))

# add page 6 from input1 to output document, unchanged
output.addPage(input1.getPage(5))

# finally, write "output" to document-output.pdf
outputStream = file("PyPDF2-output.pdf", "wb")
output.write(outputStream)

# Dont forget to close the output pdf file.
outputStream.close()

# Finally the modified pdf file will be stored in the current working directory.

Note:

For more examples keep checking this blog.

Monday 10 October 2016

Download a YouTube video with Python pytube module !!

First we need to do basic setup of python and the "pytube" module installation.

For basic python setup see the following video's:
Installation of pytube module using pip:

For installing a python module see the following video : https://www.youtube.com/watch?v=5zEQaYBukz4

pip install pytube

Note:
Seems there is an error with the new update of pytube when we try executing below command,

w = YouTube("https://www.youtube.com/watch?v=HNKQev4KLGE")

error seems some thing like this,

pytube.exceptions.RegexMatchError: regex pattern (\W['"]?t['"]?: ?'"['"]) had zero matches

so try the below command for pytube installation which will give the latest master merge of pytube,

pip install -U pytube

Now the code required to download a you tube video:

from pytube import YouTube

# not necessary, just for demo purposes.
from pprint import pprint

w = YouTube("https://www.youtube.com/watch?v=HNKQev4KLGE")

# Once set, you can see all the codec and quality options YouTube has made
# avaiilable for the particular video by printing videos.

# printing in normal method. 
w.get_videos()

# [<Video: MPEG-4 Visual (.3gp) - 144p - Simple>, <Video: MPEG-4 Visual (.3gp) - 240p - Simple>, <Video: H.264 (.mp4) - 360p - Baseline>, <Video: H.264 (.mp4) - 720p - High>, <Video: VP8 (.webm) - 360p - N/A>]

# Printing by using pprint module.
pprint(w.get_videos())

 #[<Video: MPEG-4 Visual (.3gp) - 144p - Simple>,
 # <Video: MPEG-4 Visual (.3gp) - 240p - Simple>,
 # <Video: H.264 (.mp4) - 360p - Baseline>,
 # <Video: H.264 (.mp4) - 720p - High>,
 # <Video: VP8 (.webm) - 360p - N/A>]

# The filename is automatically generated based on the video title.  You
# can override this by manually setting the filename.

# view the auto generated filename:
print(w.filename)

# Pulp Fiction - Dancing Scene [HD]

# set the filename:
w.set_filename('python installation')

# You can also filter the criteria by filetype.
pprint(w.filter('3gp'))

#[<Video: MPEG-4 Visual (.3gp) - 144p - Simple>,
# <Video: MPEG-4 Visual (.3gp) - 240p - Simple>]

# Notice that the list is ordered by lowest resolution to highest. If you
# wanted the highest resolution available for a specific file type, you
# can simply do:
print(w.filter('mp4')[-1])
# <Video: H.264 (.mp4) - 720p>

# You can also get all videos for a given resolution
pprint(w.filter(resolution='480p'))

# [<Video: H.264 (.flv) - 480p>,
#  <Video: VP8 (.webm) - 480p>]

# To select a video by a specific resolution and filetype you can use the get
# method.

video = w.get('mp4', '720p')

# NOTE: get() can only be used if and only if one object matches your criteria.
# for example:

pprint(w.videos)

#[<Video: MPEG-4 Visual (.3gp) - 144p>,
# <Video: MPEG-4 Visual (.3gp) - 240p>,
# <Video: Sorenson H.263 (.flv) - 240p>,
# <Video: H.264 (.flv) - 360p>,
# <Video: H.264 (.flv) - 480p>,
# <Video: H.264 (.mp4) - 360p>,
# <Video: H.264 (.mp4) - 720p>,
# <Video: VP8 (.webm) - 360p>,
# <Video: VP8 (.webm) - 480p>]

# Since we have two H.264 (.mp4) available to us... now if we try to call get()
# on mp4...

video = w.get('mp4')
# MultipleObjectsReturned: 2 videos met criteria.

# In this case, we'll need to specify both the codec (mp4) and resolution
# (either 360p or 720p).

# Okay, let's download it! (a destination directory is required)

# Destination for unix platform users.
video.download('/tmp/')

# Destination for windows platform users.
video.download('C:\Python27\files')

Note:

Keep seeing my blog for latest methods and downloading a playlist of you tube videos using pytube module.

Thursday 6 October 2016

How to download a you tube video with python script !!

Now downloading a you tube video is very easy we can do it by using any of the you tube down loaders or idm.

But why to install down loaders we can directly use python to do this job.

In this Post i am going to tell you about how to download videos from You tube:

Python module required to do this task:

youtube-dl

Module installation:

            pip install youtube-dl

Now to download a You tube video you require the url of it and then use the following code to download it:

import youtube_dl

a = {}

with youtube_dl.YoutubeDL(a) as y:
   y.download(['https://www.youtube.com/watch?v=lJD38DjY1Cg'])


This download the video present in the above mentioned url:
https://www.youtube.com/watch?v=lJD38DjY1Cg

to your current working directory.


You can see your current working directory by using following commands:

import os
cwd = os.getcwd()


Also you can change the save location of the videos by changing the location of current working directory by using following commands:

os.chdir(<path>)


Note:

Keep checking my blog for further post on how to download all videos in a playlist and a youtube channel and many more.

Parsing of Jenkins data with Python.

To know about Jenkins see my post:
http://pythoninterface.blogspot.in/2016/10/what-is-jenkins.html

In my present company i am working with Jenkins for automating lot of projects.
For most of the projects i will write the code in Python, Perl and Shell.

Then i just use my company Jenkins page and i will create a new project for it and i will make settings for the project such that Jenkins will run my script on a particular server in time which i mentioned in daily basis and also i set ed the mail triggering also.

Now as Jenkins runs my code daily and stores the content & result and relevant details, i want the data to be called in my other codes for this purpose i use python module Jenkins for handling Jenkins like a remote.

Installation of Jenkins module:

pip install jenkinsapi


Then open python console:

import jenkinsapi
from jenkinsapi.jenkins import Jenkins

Now you can test the functionalities of the module by using dir command:

dir(Jenkins)

You will get output as:

['RETRY_ATTEMPTS', '__class__', '__contains__', '__delattr__', '__delitem__', '__dict__', '__doc__', '__eq__', '__format__', '__getattribute__', '__getitem__', '__hash__', '__init__', '__len__', '__module__', '__new__', '__reduce__', '__reduce_ex__', '__repr__', '__setattr__', '__sizeof__', '__str__', '__subclasshook__', '__weakref__', '_clone', '_poll', '_poll_if_needed', 'base_server_url', 'build_job', 'copy_job', 'create_job', 'create_node', 'credentials', 'delete_job', 'delete_node', 'delete_view_by_url', 'get_artifact_data', 'get_create_url', 'get_credentials', 'get_data', 'get_executors', 'get_jenkins_obj', 'get_jenkins_obj_from_url', 'get_job', 'get_jobs', 'get_jobs_info', 'get_jobs_list', 'get_label', 'get_master_data', 'get_node', 'get_node_url', 'get_nodes', 'get_nodes_url', 'get_plugins', 'get_plugins_url', 'get_queue', 'get_queue_url', 'get_view_by_url', 'has_job', 'has_node', 'has_plugin', 'install_plugin', 'install_plugins', 'items', 'iteritems', 'iterkeys', 'jobs', 'keys', 'nodes', 'plugins', 'poll', 'pprint', 'process_job_folder', 'python_api_url', 'rename_job', 'resolve_job_folders', 'safe_restart', 'strip_trailing_slash', 'validate_fingerprint', 'validate_fingerprint_for_build', 'version', 'views']

Now we need to map the jenkinsapi to our Jenkins i.e, the local jenkins server:

j = Jenkins('<local jenkins server path>')

Example:
                   j = Jenkins('http://localhost:8080')

Now to check the version of Jenkins which we use,

J.version

which will give the version details.

To get all Projects present in Jenkins use:

J.keys()

This will give all the project keys and we can use a relevant project key which we want and we can extract the data of it.

For example lets consider output of above command as,

['fooo', 'test_1']

Then if u want the details of "test_1" project use,

j1 = J['test_1']

to check it functionalities use dir of it,

dir(j1)

which will give,

['RETRY_ATTEMPTS', '__class__', '__delattr__', '__dict__', '__doc__', '__eq__', '__format__', '__getattribute__', '__getitem__', '__hash__', '__init__', '__len__', '__module__', '__new__', '__reduce__', '__reduce_ex__', '__repr__', '__setattr__', '__sizeof__', '__str__', '__subclasshook__', '__weakref__', '_add_missing_builds', '_buildid_for_type', '_config', '_data', '_element_tree', '_get_config_element_tree', '_get_hg_branch', '_mk_json_from_build_parameters', '_poll', '_revmap', '_scm_map', '_scmbranchmap', '_scmurlmap', 'baseurl', 'delete_from_queue', 'disable', 'enable', 'get_build', 'get_build_dict', 'get_build_ids', 'get_build_metadata', 'get_build_triggerurl', 'get_buildnumber_for_revision', 'get_config', 'get_config_xml_url', 'get_data', 'get_delete_url', 'get_description', 'get_downstream_job_names', 'get_downstream_jobs', 'get_first_build', 'get_first_buildnumber', 'get_jenkins_obj', 'get_last_build', 'get_last_build_or_none', 'get_last_buildnumber', 'get_last_completed_build', 'get_last_completed_buildnumber', 'get_last_failed_buildnumber', 'get_last_good_build', 'get_last_good_buildnumber', 'get_last_stable_build', 'get_last_stable_buildnumber', 'get_next_build_number', 'get_params', 'get_params_list', 'get_queue_item', 'get_rename_url', 'get_revision_dict', 'get_scm_branch', 'get_scm_type', 'get_scm_url', 'get_upstream_job_names', 'get_upstream_jobs', 'has_params', 'has_queued_build', 'invoke', 'is_enabled', 'is_queued', 'is_queued_or_running', 'is_running', 'jenkins', 'load_config', 'mk_json_from_build_parameters', 'modify_scm_branch', 'modify_scm_url', 'name', 'poll', 'pprint', 'process_job_folder', 'python_api_url', 'resolve_job_folders', 'strip_trailing_slash', 'update_config', 'url']

now you can check all the functionalities of it.

Example:

                if you want to get last good build use command as,

                j1.get_last_good_build()


Note:
Keep checking this site for further update of new codes. 

What is Jenkins !!

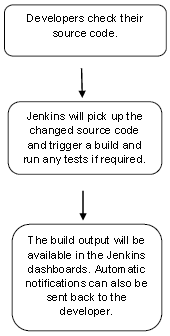
Jenkins is a software that allows continuous integration.
  • Jenkins is a powerful application.
  • Using this u can create projects for any platform.
  • It is used for automation's.
  • It is used widely in my companies for their nightly runs.

Jenkins will be installed on a server where the central build will take place. The following flowchart demonstrates a very simple workflow of how Jenkins works.
Why Jenkins

system requirements for using Jenkins:

JDKJDK 1.5 or above
Memory2 GB RAM (recommended)
Disk SpaceNo minimum requirement. Note that since all builds will be stored on the Jenkins machines, it has to be ensured that sufficient disk space is available for build storage.
Operating System VersionJenkins can be installed on Windows, Ubuntu/Debian, Red Hat/Fedora/CentOS, Mac OS X, openSUSE, FReeBSD, OpenBSD, Gentoo.
Java ContainerThe WAR file can be run in any container that supports Servlet 2.4/JSP 2.0 or later.(An example is Tomcat 5).

Monday 3 October 2016

Python program to take screen shot

Basically we use "print screen" button in keyboard for many purposes.

Lets imagine a situation where we have to take a screen shot for every 10 mins or for a specific time and save the images. Then in order to do the task we need to do a repetitive work for every 10 mins or specific time.

In order to avoid this kind of situations we use a automation script to do this task.

In this post i will tell how to do this by using python scripting.

Before going further you need to be ready with following setup:

  • Python 2.7 version installation.
  • pip installation.


For doing this you can see my posts or you can watch them on my you tube channel:
https://www.youtube.com/playlist?list=PLLoBlNaX1gGMn3Xc24TcV56YQfwPSsh9U

Modules to be installed for this task:
pyscreenshot and pillow

These modules can be installed by using "pip".

Open command prompt and go to the path where pip is installed or recognised and run the following commands for installation and integration of them in the python,

pip install pyscreenshot
pip install pillow

Now open python IDLE in the start -> python 2.7 -> IDLE.

import pyscreenshot

check the functionalities of the module by using dir command on it,

dir(pyscreenshot)


now in order to capture the screen use the command,

a = pyscreenshot.grab()

Now in order to save this capture with respective name and format use the following command,

a.save("screenshot.png","png")

Now,
The screen shot is stored in current working directory.
Similarly you can use other formats for saving it.

Note:
Keep checking this site for further update of complete code. 

Hello World program in python

The "Hello World" Program is a basic program to check the output display on console in any programming language.

Here in this blog i will be posting all posts regarding python language.

So, in order to test the console output of python we are going to use the following code.

Lets open a empty file in notepad or any other editor.

Then write the following code in it,

print "Hello World"

Then save the file as "helloworld.py" and save the file in your respective location.

Then open command prompt and go to the path where python is installed and run the following command:

python your_working_directory/helloworld.py

Now you can see the output as:

Hello Wold

on the python command prompt.

For watching the swapping in live you can watch my youtube channel:
https://www.youtube.com/channel/UCkA5xUrlbkdBpZV5WJ2iM0w

Also you can watch the swapping video :
https://www.youtube.com/watch?v=yjW8XqdQm0s

Swapping

In general swap means "to exchange".

Here i am going to write a code for swapping of 2 numbers in python, but before going to it lets see the logic of how to swap 2 numbers with and with out using third variable.

Logic for swapping of values of 2 variables with using third variable:

let,
a = 4, b = 7 and lets take a third variable as c.
now,
c = a
a = b
b = c
now if you see the result then we can see the value of a and b got swapped.
i.e,
a = 7 and b = 4

Logic for swapping of values of 2 variables without using third variable:

let,
a = 4 and b = 7
now,
a = a+b
b = a-b
a = a-b
now if you see the result then we can see the value of a and b got swapped.
i.e,
a = 7 and b = 4

The above logic is what we will use in c or any other programming language.
But , in python we have a special functionality for comma (",").

The code in python is:

let,
a = 4, b = 7 and lets take a third variable as c.
now,

a,b = b,a

now if you see the result then we can see the value of a and b got swapped.
i.e,
a = 7 and b = 4

Even the above logic also works in python.

For watching the swapping in live you can watch my youtube channel:
https://www.youtube.com/channel/UCkA5xUrlbkdBpZV5WJ2iM0w

Also you can watch the swapping video :
https://www.youtube.com/watch?v=2stFc_u8o6Q